Deprecated in Current Release
| Requirements | Software operation | Defining Calibration Tasks | Definitions and Theory |
|---|---|---|---|
The Geometric Calibrator works on planar checkerboard targets with an appropriate center fiducial.
Planar Checkerboard
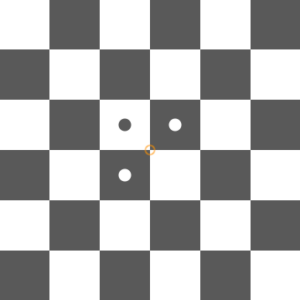
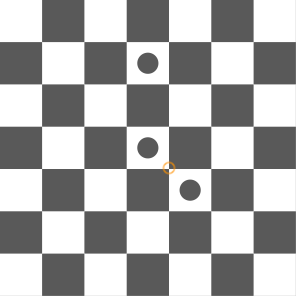
Center Fiducial Patterns
The Geometric Calibrator requires that checkerboard targets have a fiducial pattern identifying a unique center point.
This allows unique point correspondences to be made between views as long as the fiducial pattern is observed. It also allows for a check on the orientation of the camera, and the focal plane inside the camera, relative to the target.
The module supports two fiducial types:
 Type 1 Fiducial |
 Type II Fiducial |
The chart center is marked with an orange circle (this will not be on the printed chart). This point is used as the world coordinate system origin when declaring device positions in Test Capture definitions.
Design Requirements
The target’s required total size and checker pitch is highly dependent on the camera system to be calibrated. Refer to the Test Setup page for more details.
Checker shape
Standard checkerboard patterns ideally have square checkers, and are parameterized by a single value identifying that size.
The module can also accept checkerboards that are not perfectly square, whether by design or by imperfect production.
Extremely high-accuracy requirements may find that even a 0.1% deviation from squareness can invalidation calibration results. However, this can be overcome as long as the deviation is known and accounted for. Thus targets may be measured for the actual as-produced checker sizes in each dimension, and these values can be entered appropriately in the Target definition input.
Physical requirements
The checkerboard target shall be flat to within one-one thousandths times the smallest linear dimension of the chart (max depth – min depth). E.g., a 2m x 1m chart shall be flat to 1mm.
Note that it is important to maintain and check this flatness over time. Targets that have become bowed can cause a very subtle bias to affect calibration results, but fortunately this can be caught fairly easily by checking the target periodically.


